Joint lever Air mixture
Saab 9-5 (-2010)
23.11.2021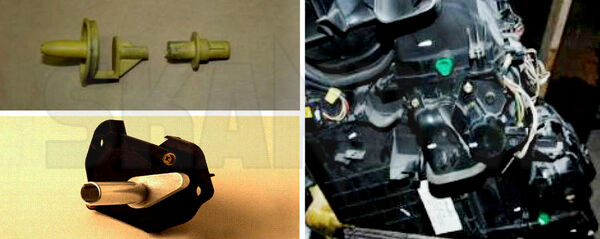
The shaft of the original lever that connects the stepper motor to the mixing valve usually breaks at the point you can see in the picture above.
For exactly this repair, we offer you a replacement part specially made of aluminium, which is attached to the stepper motor as shown in the picture above.
To make the installation easier, or even possible at all, we recommend readjusting the shaft of the stepper motor. To do this, you can use the supplied repair lever like a tool (see the picture above). After the adjustment, the cam of the repair lever should be above the screw (in the picture you can see this screw to the left of the cam). Adjusting the stepper motor requires a lot of force at first, but this becomes less once you have managed to move the lever).
Normally, a conventional repair takes 10 to 15 hours, as the complete heating system has to be dismantled and replaced.
The repair kit for the air-conditioning system`s air-mixing flap lever reduces the repair time to about one hour. First loosen the panelling to the ventilation unit on the side in question in order to access the stepping motor. The illustration below shows the installation in the left side of the vehicle. First remove the stepper motor, the temperature sensor and all yellow parts that belonged to the old articulated lever.
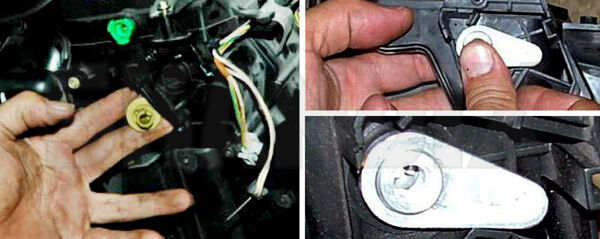
Reach into the casing and remove the remaining broken yellow shaft. This is often not easy. It may help to adjust the flap, which can sometimes require quite a lot of force! You may also be able to carefully cut the yellow stem from the shaft with a small saw blade.
Now you can place the new aluminium repair piece on the shaft.Make sure that you hold the shaft from the back side with one hand!
If you have not yet done so: Re-adjust the servo motor with the new aluminium repair lever as described in picture 2.
Now put the cover with the new aluminium repair lever back on the heater box while supporting the other half of the broken joint lever from the inner housing part and press both parts together.
Reconnect the "elbow" and the servo motor and put the covers back on.
Attention
Check the green bushings, which you can also see in pictures 3 and 4. These often break. The part number for the bushing is Skandix number 1016222. The new bushing is white and Service Bulletin 854-2461 must be followed!
Now clear all codes from the A/C system using the Tech 2 and recalibrate the system.
If you do not have a Tech 2, recalibrate the system by pressing the "Auto" and "Off" buttons simultaneously. Make sure that the air conditioning recirculation flap is working properly and that the system is filled with enough coolant. The operating lever of the recirculation flap occasionally breaks, the SKANDIX number for this is: 1014391.
- All notes serve only as an example and do not replace the workshop instructions of the automobile manufacturers! All information is supplied without guarantee!
Additional information...
- Installation guide: Joint lever Air mixture
23.11.2021, 221 KBytesDownload now


