Headliner Kit
Volvo 700, 900
24.10.20222. Remove any old material still stuck to the shell. Be careful not to bend the shell or it will break. It is common to have a few breaks especially around the sunroof opening and the visor area.
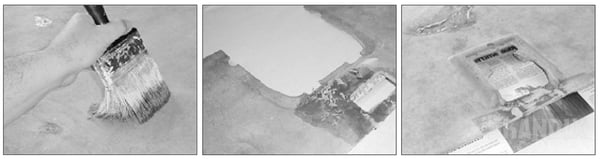
3. The foam left behind can be rubbed off with your fingers or use a stiff bristled brush to remove the foam. If you move in the same direction with a brush it will go quite quickly. Once the foam is loose go back over the same areas to double- check for cleanliness.
4. Once the whole shell is completely clean check for cracks and divots to repair. Any indentations and cracks may show through the new material.
5. Pry the metal clip to remove it from the dome light hole.
6. The best repair to the shell is a resin fiberglass repair. You can find a resin repair kit in most hardware stores. It is the same material used to repair boats and auto body fiberglass. Photos at right show some repairs done using the instructions on the can. It is a two-part mixture, which hardens in about 30 minutes. Once hard it can be sanded smooth if necessary.
7. The resin repair material can also be used to fill any divots. It soaks into the shell so a second coat may be necessary.
Applying the new material to the clean shell
This step will require a helper and is easiest if done in two steps. First gluing the rear half and then folding the rest over to the front half. Preparing the area around the shell will pay off later in cleaning up. Use lots of newspaper to allow for at least a two foot overspray around the shell. Don?t forget the sunroof opening.
1. Readtheinstructionsontheadhesivecan.Payattentionto the temperature required for best adhesion. A dry run without the adhesive is a good idea to get the feel of the job. Once the adhesive is applied you have only one try.
2. Lay the new material over the entire shell and trim the long end but allow plenty of material - about six inches on both ends. The extra material can be used for the sunroof headliner, so trim it off and roll it up and put it aside.
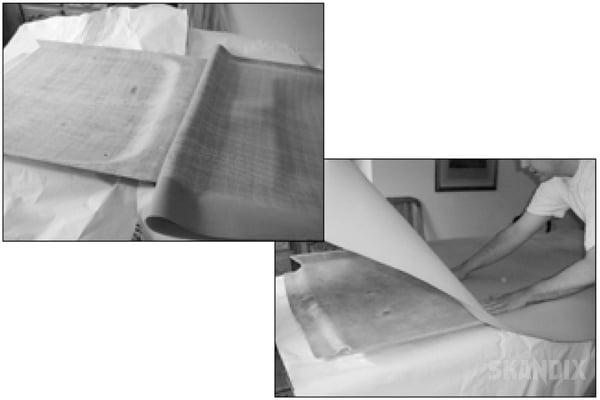
3. Fold the material from the rear half over onto the front half so the foam back is facing up and the rear half of the shell is exposed- ready for the spray glue. Make sure you start ahead of the dip behind the sunroof. Following the directions on the adhesive spray can apply it to both the headliner material and the shell using as many coats as recommended.
4. Wait the recommended time. Have your helper fold the headliner back over the rear of the shell holding the headliner just above the shell so you can smooth the material from the center toward the rear.
5. Pay attention to the dip in the shell behind the sunroof. The material is elastic so it will conform to the shell using even motions with your hands. Do not use uneven pressure on the material or the foam will absorb the glue and stay compressed, leaving an uneven finish. Smooth as you go ending at the rear. Go back over the entire area especially the sides and smooth in any indentations in the shell so the material now conforms to the shell.
6. Now spray the adhesive on the front half and do the same steps as on the rear half. Be sure to have your helper pull the material taut to avoid a fold in the center. It is a bit of a challenge to work around the sunroof opening and keep it tight so there are no extra folds in the material. Smooth it out to the end and gently form the material to the mirror bulge and the visor indentations.
7. Once the gluing is complete, trim the outside edge with scissors. The front and rear edges have to be neat but the sides are hidden with trim.
8. Cuttheopeningsforthedomelight,mirror,visor,visorclips and the turn clips. Wait until after installation for the sunroof and sunroof crank opening.
Reinstalling the completed headliner
1. Replace the metal clip at the dome light. It clips on the front side of the opening, crimping the headliner.
2. Have the plastic turn clips ready as well as the plastic rail that attaches to the metal clips above the windshield.
3. Locate the wires to both dome lights so they will be easy to pull through the holes once installed. Duct tape is what Volvo used and it will still work fine.
4. With help, maneuver the headliner into place next to the roof. Hook the dome light clip in place, moving the headliner from the front toward the rear. Pay attention to the rear of the headliner - the wagon is above the inner sheet metal near the hatch. The sedan avoids the rear quarter window side pieces and fits into the rear plastic rail above the rear window.
5. Attach the center of the headliner with the turn screws. Sedan turn screws are near the rear.
- All notes serve only as an example and do not replace the workshop instructions of the automobile manufacturers! All information is supplied without guarantee!
Additional information...
- Installation guide: Headliner Kit
24.10.2022, 414 KBytesDownload now
-
 1017528: Headliner Textile beige