Flanging brake lines
Universal
27.06.2023Basics in do-it-yourself flanging and mounting of brake lines
If someone wants to flare and bend new brake linings by himself, he will get a multitude of offers and tips which can confuse.
Now I will write some basics about that.
At first a note of safety: Brakes are security-relevant parts. Unprofssional repairs don`t have any right to exist and could pass in serious accidents.
In case of doubt you better visit a professional mechanic!
Brake lines are normally made of two materials, steel or cunifer. Cunifer is a composition of copper, nickel and iron which is rust-free. Pipes which are licensed as brake lines must be marked all few centimeters, for example with the declaration of the composition. today, steel brake lines are normally plastic coated, which must be touched up immediately if it is scratched.
In the past they were zinc-plated and much better corrosion-resistant.
Also steel lines are harder to handle than those made of cunifer. Cutting, flanging, bending - it`s all easier to handle with cunifer. And it ist rust-free!
In Germany, sometimes I heard of problems with cunifer at the general inspection. If you have such a institution in your country, you better speak with your engineer before you mount cunifer brake lines.
Forbidden ist using pipes of pure copper for brake lines as sometimes offered on Internet trading platforms. It is not enough pressure resistant an not marked.
Your brake lines naturally must have the right dimension. Today this is normally 4,75mm or 3/16" in passenger cars.
Cleanliness is the first commandment while you`re manufacturing your brake lines. Some dirt or chips in your flangings will damage them or may result in leaks. Dirt in hydraulics would damage cylinders and seals.
The pipe cuts for brake lines must be exactly vertical. This is very easy to do with a pipe cutter (picture).
Locate the pipe cutter, tighten and turn it around, thighten and so on, as far as the pipe will fall apart. Don`t do this with a bow saw, this will be definitly unexact. If the cut won`t be exactly vertical the flangings would get sloping and leak.
Now it is necessary to trim the cut. If you don`t trim it, your flangings will get leak and you can damage the pressure pad of your flaring tool.
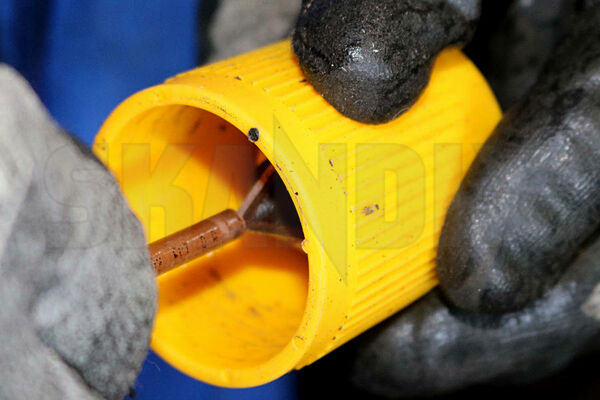
The best for this is a small pipe reamer (next picture). It has one side for internal and one for external reaming.
Now you should know the flare version which is used in your car. Today mostly used is the DIN-F flare, in older cars it can be SAE-F. In american and japanese cars the E flare is often used. This you have to check exactly. Therefore you have to buy and use the correct fittings. You can also have different threads, in european cars mostly metric M10x1, in rare cases sometimes M12 at the ABS breaking device. In american cars or older Volvo for example you will find UNF 3/8-24.
The fittings can have a guide collar or not, the mostly established version in european cars is M10x1 with the guide collar as you can see in our pictures.
Don`t use the wrong fittings, you can earn leaks or damage fittings and flares.
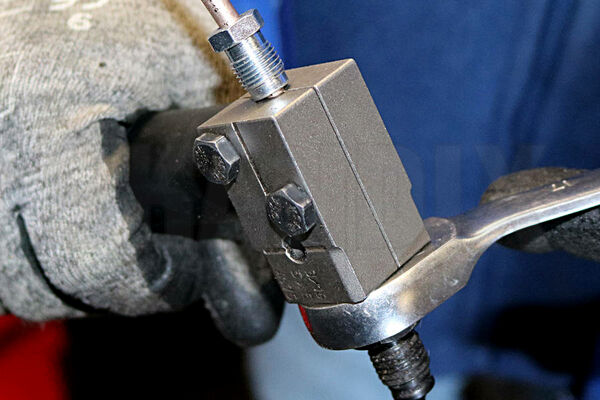
This is about the choice of the right flare tool. The first question is the material of the pipe you will use. Many of the cheaper flare tools are not suitable for steel pipes. Using such tools it can happen that you can`t form your first flare before fitting of the pressure pad is broken. I advice to avoid such cheap flare tools.
On the other side you can buy professional tools made by Hazet, Dako or Gedore, which produces perfect flares. You can only use them in a bench vice. These tool are robust an multi-functional but they are expensive. You can also produce a 10mm fuel-line, for example. But you can`t use these tools free-hand under the car if you only want to replace a part and produce a flare on an old brake line.
Recently you can buy manual or hydraulic flare tools, which only produces one or two versions of flare. These tools have a practical hand grip so that you can use them under the car. They mostly have a good value for money, a few weeks ago I tested such a tool on my own car. It did a good job, also working with old lines of steel (Skandix No. 1071065 for DIN-F).
I recommend the choice of the flare tool in your needed Applications. If you need it only for your own car, a small tool with one flare version is adequate.
If you`re working in your own work shop or you have to service a great car collection you better buy a professional tool or more than one.
There is a great difference in the price: You can buy such a tool from 50 up to more than 400?.
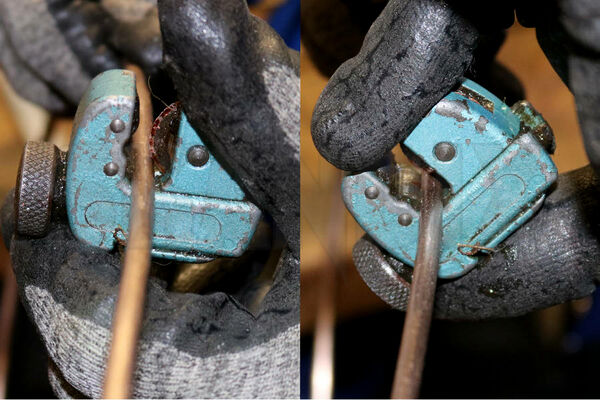
Now we`re working around to the procedere of flanging. At first you put the fitting on the cutted and trimmed brake line. Don`t forget the fitting, if your flare is ready, you can`t put it on!
The pipe must be free of grease and clean, otherwise the line would slip out of the flare tool. Brake fluid is out of place as well!
Put the line into the flare tool. The line has to look a required measure out of the clamping, this is the Material for the flare. At some tools you have a mark for this, at others you have a stopper, at some of them you have to measure by yourself.
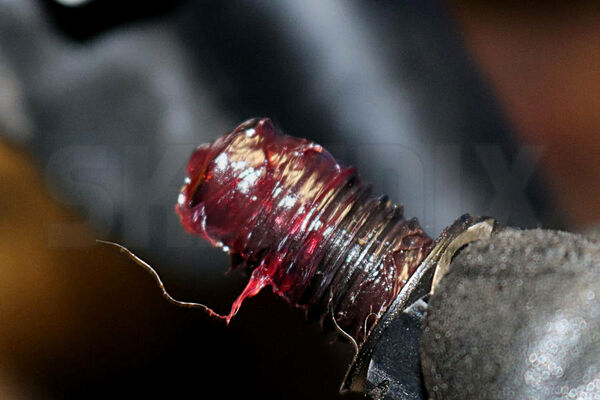
Clamp the line strong in the flare tool an push the pressure pad into the line (next picture)
Therefore put some Grease on the thread of spindle or pressure pad, in the case may be (picture). Put it even on the pin of the pressure pad to prevent clamping or seizing.
After pressuring to the bedstop declamp the pressure pad and the clamping of the brake line. Clean the brake line from grease an other pollution.
If you need an E-Type flare, you have to produce a F-Type flare before this.
The E-Type must be pressured into the F-Type, it is a precondition.
If you want to bend the line before flanging, you can do this. But think of the distance you need for fitting and flare-tool: The first 8-10cm of the line must be straight from the next bending. If not, you`ll get a problem with your flare tool and you can`t slip the fitting over the bending.
And don`t laugh, such accidents happened to the best mecanics.
For bending of the brake lines, the first rule applies to the bending radius: The bending radius mustn`t be smaller than threefold diameter of the brake line. And this is very closely, it better would be a bit wider.
If the bending radius is too closely you have a graet risk of bending down or cross-section reduction. If you want to work without a hickey, you better have a strong thumb and a pipe in your bench vice, with a hickey it`s easier to do.
Bending Cunifer is easier than steel pipe. While bending plastic coated steel very often the coating gets damaged in a close radius. On this damages you have to refinish the coating or your new brake line would be corroded quckly.
A close radius near the fittings isn`t generally easy to bend, also in cunifer.
This is better and easier to do with a hickey. You have to decide about the acquiring of a hickey by yourself. Surely the bendings of a hickey are looking better than the manual bended. For a valuable oldtimer this would be the last detail in refinishing.
Fixing the fitting you have to comply with the moments of torque. The threads are easy damaged, if your flare is bad, you can seal it with too much moment of torque. In this cas you have the risks of damaging the threads and, especially at the SAE-F flare, the fitting may burst because of the pressure. Then you won`t get it out of it`s borehole anymore.
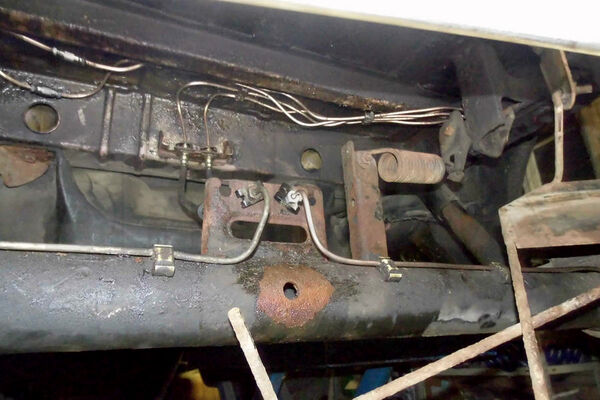
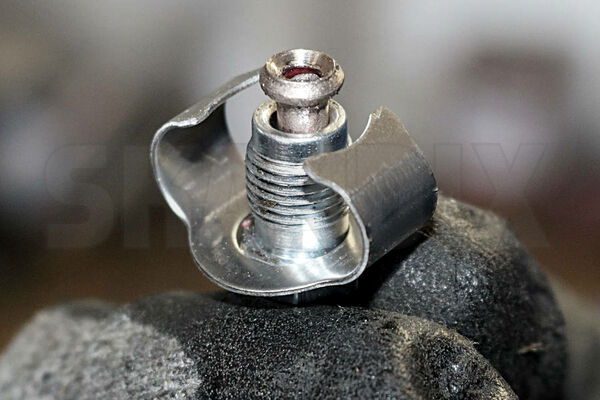
At the fitting between brake line and brake hose are brake hose clamps (picture). You better make them new, they are rusty and they mostly won`t hold the fitting anymore. You also better renew the brake hoses, you have them already in your hands now.
The Brake lines must be piped free of stresses in their holding clamps, they mustn`t rub at the body. Broken holding clamps at the body you also have to renew. If you use branke lines of steel I recommend putting some grease in the holding clamps. This will give the lines a solid corrosion protection if the coating is bashed.
Very important, when you now want to bleed your brake system:
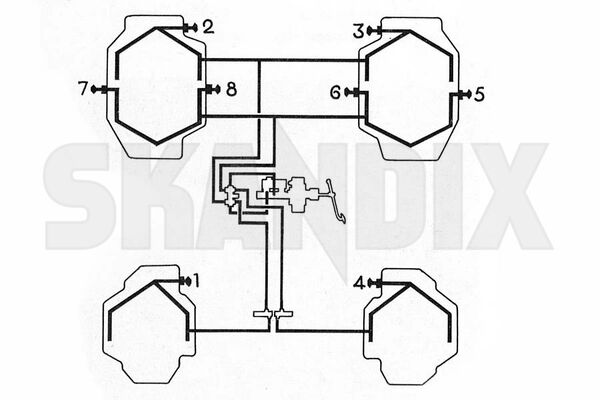
At first you have to maintain the sequence of bleeding. This is normally at first the wheel farthest away from the master cylinder, in an LHD the rear right for example. Then you take the next farthest away and so on.
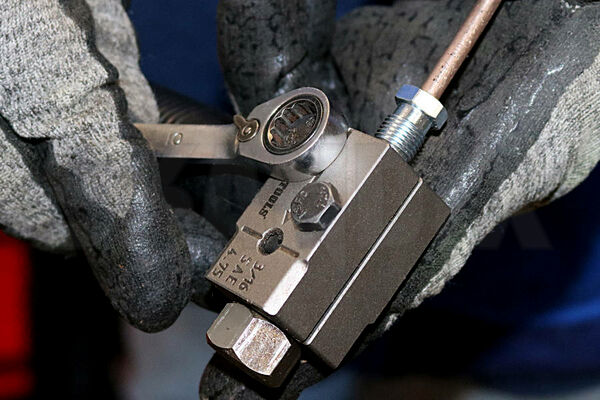
The exception proves the rule: In some old Volvo models with the dual-circuit brake form the P1800 up to the early 240 you have to use a very special sequence of bleeding (picture, from an old volvo workshop manual). The brake junction block with the differential pressure switch (Skandix 1037068) requires this.
In later cars with ABS sometimes you have to bleed the ABS device seperately.
You have to take notice of the manufacturers workshop manuals for such specials!
After bleeding the brake hydraulics, you have to check the leak-tighness of every fitting carefully. Therefore you need a helping person which applies the brake strong. While the brake is applied, you check every fitting under the car.
After such repairs a car never should be back on the street without a careful check and a test drive.
- All notes serve only as an example and do not replace the workshop instructions of the automobile manufacturers! All information is supplied without guarantee!